

Forget Selenium: Building AI Agents with browser-use & DeepSeek (The New 2026 Standard)
Table of Contents
If you have ever written a web scraper in Selenium, you know the pain.
You spend hours inspecting HTML, finding the perfect CSS selector (div > span > button.id-42), and running your script… only for the website to change its layout the next day and break everything. You fix it, deploy it, and then a random popup appears that your script wasn’t programmed to click, and the whole thing crashes again.
My Hosting Choice
Need Fast Hosting? I Use Hostinger Business
This site runs on the Business Hosting Plan. It handles high traffic, includes NVMe storage, and makes my pages load instantly.
Get Up to 75% Off Hostinger →⚡ 30-Day Money-Back Guarantee
I have spent the last 1.5 years building automation Scripts and i have made many python scripts for Video Automation and Poster Automation, and I can confidently say: DOM-based scraping is dead.
In 2026, we don’t need to hunt for div tags anymore. We have Vision Models.
A new library called browser-use has taken the Python world by storm (passing 20k+ Stars on GitHub in months). Instead of writing brittle code to find buttons, you simply tell an LLM: “Go to Amazon, find the cheapest mechanical keyboard, and add it to my cart.”
And it actually works. It sees the page, understands what a “Cart” button looks like, and clicks it—just like a human would.
I recently connected browser-use to our Local DeepSeek-R1 stack , and the results were terrifyingly good. My agent navigated complex React apps, handled popups, and filled out forms, all running locally for $0.
Here is the complete guide to building your first autonomous web agent in 5 minutes.
The “Visual” Revolution: Why browser-use Kills Selenium
To understand why this is a paradigm shift, you have to look at how we used to do things versus how browser-use does them.
The Old Way: Blind Automation (Selenium/Playwright)
Traditional tools are “Blind.” They don’t see the screen; they only see the underlying code.
When you tell Selenium to click('login_btn'), it searches the HTML text for that ID.
- Fragile: If the developer changes the ID to
login_button_v2, your script crashes. - High Maintenance: You are constantly updating selectors.
- Anti-Bot Prone: Websites know that humans don’t look at HTML; they look at pixels.
The New Way: Visual Automation (browser-use)
browser-use operates on a completely different philosophy. It uses Playwright to open the browser, but instead of asking you for selectors, it takes a Screenshot and extracts the Accessibility Tree.
It feeds this visual data to an LLM (like DeepSeek or GPT-4o) and asks: “Where is the ‘Login’ button?”
The LLM responds: “It is at coordinates (x: 200, y: 500).”
The library then simulates a mouse click at those coordinates.
| Feature | Selenium / Playwright | browser-use |
| Navigation | driver.find_element(By.ID, "login") | "Log in to the site" |
| Resilience | Breaks if ID changes | Self-Healing (Finds the button visually) |
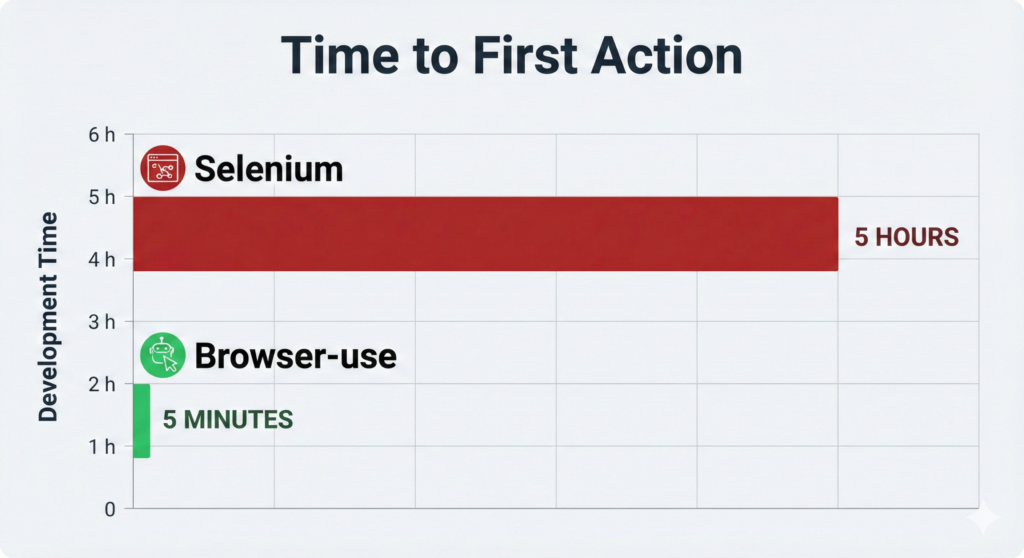
| Setup Code | 50+ lines | 5 lines |
| Cost | Free | Free (with Local DeepSeek) |
This means browser-use is Self-Healing. If the “Login” button moves from the top right to the center of the screen, your script doesn’t break. The AI just “sees” it in the new location and clicks it anyway.
Step 1: The Stack (Going 100% Local)
Most tutorials for browser-use will tell you to use OpenAI’s GPT-4o. While GPT-4o is excellent at vision tasks, it costs money—about $0.01 per step. If your agent gets stuck in a loop, you can drain $10 in a few minutes.
We are going to build the “Free Stack” using the local DeepSeek model we set up last time.
Prerequisites:
- Python 3.11+ installed on your machine.
- Ollama running in the background.
- RAM: At least 16GB (since we are running a browser AND an LLM or kaggle which i am using and provided code in the last).
Installing the Dependencies
Open your terminal. We need the main library, the LangChain bridge (to talk to Ollama), and Playwright (the browser engine).
# Install the Python libraries
pip install browser-use langchain-ollama playwright

# Install the browser binaries (Chromium)
playwright install
Note: If you are on Linux, you might need to install additional system dependencies for Playwright.
Step 2: The Code (DeepSeek Integration)
This is the tricky part where most people get stuck. browser-use is natively designed for OpenAI. To make it work with Ollama, we have to perform a little “surgery” using LangChain.
We need to pass a context window (num_ctx) that is large enough. Why? Because the “Accessibility Tree” of a modern website (like Amazon or LinkedIn) is huge. If you use the default 4k context window, the AI will “forget” half the page and won’t be able to find buttons.
Create a file called web_agent.py and paste this code:
Useful Links
- Is Bun Ready to Replace Node.js in Production? A 2025 Developer’s Take
- Software Development Life Cycle (SDLC) in 2025: Stages, Models, and Modern Practices
- The Rise of Composable Software: Why Developers Need to Think Modular in 2025
- Toil is Back: Why Even with AI, SREs Feel the Burn in 2025
- Best Python Libraries for Automation Developers Overlook in 2026
- Functional Programming in 2025: Are Pure Functions Making a Comeback?
import asyncio
from langchain_ollama import ChatOllama
from browser_use import Agent
from browser_use.browser.browser import Browser, BrowserConfig

# ==========================================
# CONFIGURATION
# ==========================================

# 1. Setup the Free LLM (DeepSeek via Ollama)
# CRITICAL TIP: We bump 'num_ctx' to 32000.
# DeepSeek needs massive context to "read" the entire HTML structure of a page.
llm = ChatOllama(
    model="deepseek-r1:8b",
    num_ctx=32000,
    temperature=0.0, # We want precision, not creativity
)

# 2. Configure the Browser
# We run in 'headless=False' mode so you can actually watch the bot work.
browser = Browser(
    config=BrowserConfig(
        headless=False,
        disable_security=True # Helps bypass some basic bot protections
    )
)

# ==========================================
# THE TASK
# ==========================================

# No CSS selectors. Just plain English instructions.
# Notice how we give it a multi-step goal.
task = (
    "Go to 'google.com'. "
    "Search for 'Python release date 2026'. "
    "Click on the first non-ad result. "
    "Find the exact release date in the text and print it to the console."
)

# ==========================================
# EXECUTION
# ==========================================

agent = Agent(
    task=task,
    llm=llm,
    browser=browser,
)

async def main():
    print("🚀 Agent starting... Watch the popup window!")

    # Run the agent and capture the history
    result = await agent.run()

    print("\n✅ FINAL RESULT:")
    print(result.final_result())

    # Always close the browser to free up RAM
    await browser.close()

if __name__ == "__main__":
    asyncio.run(main())
Step 3: Running the Agent (and What to Watch For)
Run the script in your terminal:
python web_agent.py
Here is what will happen, step-by-step:
- The Launch: A Chromium window will pop up. It will look like a normal Chrome browser.
- The Analysis: You will see a brief pause. This is DeepSeek “reading” the page. Unlike Selenium which is instant,
browser-usetakes about 2-3 seconds per action to process the visual data. - The Action: You will see a Red Box appear around the Google Search bar. This is the agent identifying the element.
- The Input: It will type “Python release date 2026” character by character.
- The Result: It will click search, read the page, and finally print the answer in your terminal.
It feels like magic. You didn’t tell it the ID of the search bar. You didn’t tell it the XPath of the submit button. It just figured it out.
Troubleshooting: The “Infinite Loop” & Other Demons
While this library is amazing, it is not perfect. Since we are dealing with AI, it can get confused. Here are the three most common problems I faced and how to fix them.
1. The “Cookie Banner” Loop
The Problem: The agent goes to a site and sees a giant “Accept Cookies” popup. It tries to click “Search” behind the popup, fails, and tries again forever.
The Fix: You must treat the agent like a new employee. You have to tell it how to handle distractions.
- Bad Prompt: “Search for shoes.”
- Pro Prompt: “Go to amazon.com. If you see a cookie banner or popup, accept it immediately. Then search for shoes.”
2. The “Hallucination” Click
The Problem: The agent tries to click a button that doesn’t exist, or it clicks the wrong thing repeatedly.
The Fix: This usually happens because the context window is full. Make sure you set num_ctx=32000 in the code above. If it’s still failing, switch to a larger model (like deepseek-r1:14b or 32b) if your hardware can handle it.
3. The “Stuck on Loading” Issue
The Problem: The agent tries to read the page before it has finished loading.
The Fix: Add a specific instruction to wait.
- Pro Prompt: “Go to the site. Wait for the page to fully load and for the ‘Login’ text to appear. Then click it.”
Advanced: Running “Headless” for Production
Once you are happy with your bot, you don’t want to watch the window pop up every time. You can run it in “Headless” mode (background mode), which is faster and uses less RAM.
Simply change the config in your code:
browser = Browser(
    config=BrowserConfig(
        headless=True,  # Changed to True
        disable_security=True
    )
)
Warning: Some websites (like Amazon or Cloudflare-protected sites) will detect headless browsers and block them. If you get “Access Denied” errors, switch back to headless=False.
Kaggle code i am using
Since My laptop has only 16gb ram and Intel Iris Xe Graphics, I sometimes feel it is not enough for long tasks since it heats up too soon. Therefore, i always use kaggle for this kind of problems (30gb ram+ t4 Gpu for 30 hours/week). Here is the code i tested on kaggle:
import subprocess
import time
import sys

# 1. Install System Dependencies (zstd is critical!)
print("⬇️ Installing System Dependencies...")
!sudo apt-get update
!sudo apt-get install -y pciutils lshw zstd  # Added 'zstd' here

# 2. Install Ollama
print("⬇️ Installing Ollama...")
# We use curl to fetch the script and pipe it to sh
!curl -fsSL https://ollama.com/install.sh | sh

# 3. Start Ollama Server in Background
print("🚀 Starting Ollama Server...")
# We use subprocess to run it in the background so it doesn't block the notebook
process = subprocess.Popen(["ollama", "serve"], stdout=subprocess.PIPE, stderr=subprocess.PIPE)

# 4. Verification Check
time.sleep(5)  # Give it 5 seconds to boot
if process.poll() is None:
    print("✅ Ollama is running in the background!")
else:
    print("❌ Ollama failed to start. Check logs.")
    print(process.stderr.read().decode())
# Cell 2: Pull the DeepSeek Model
# We use the 8b model because it fits perfectly on Kaggle's T4 GPU.
print("🧠 Pulling DeepSeek-R1 (This takes ~2-3 mins)...")
# We use ! to run this command directly in the shell
!ollama pull deepseek-r1:8b
print("✅ Model Ready! You can now run the Agent code.")
# Install the missing Python libraries
!pip install browser-use langchain-ollama playwright nest_asyncio
# Re-install Playwright browsers (just to be safe)
!playwright install chromium
import asyncio
import nest_asyncio
from langchain_ollama import ChatOllama
from pydantic import ConfigDict
import requests
from bs4 import BeautifulSoup
import re
nest_asyncio.apply()
# ==========================================
# CONFIGURATION
# ==========================================
class CleanedChatOllama(ChatOllama):
"""ChatOllama with DeepSeek-R1 thinking tag removal"""
model_config = ConfigDict(extra="allow", frozen=False)
@property
def provider(self):
return "ollama"
@property
def model_name(self):
return self.model
def invoke(self, input, **kwargs):
response = super().invoke(input, **kwargs)
if hasattr(response, 'content'):
cleaned = re.sub(r'<think>.*?</think>', '', response.content, flags=re.DOTALL)
response.content = cleaned.strip()
return response
llm = CleanedChatOllama(
model="deepseek-r1:8b",
num_ctx=32000,
temperature=0.0,
)
# ==========================================
# AGENT LOGIC (without browser)
# ==========================================
def search_web(query):
"""Search DuckDuckGo and return results"""
print(f"🔍 Searching: {query}")
response = requests.post(
"https://html.duckduckgo.com/html/",
data={'q': query},
headers={'User-Agent': 'Mozilla/5.0'},
timeout=10
)
if response.status_code == 200:
soup = BeautifulSoup(response.text, 'html.parser')
results = []
for result in soup.find_all('a', class_='result__a')[:3]:
title = result.get_text(strip=True)
url = result.get('href', '')
results.append({'title': title, 'url': url})
return results
return []
def fetch_page(url):
"""Fetch webpage content"""
print(f"📄 Fetching: {url}")
try:
response = requests.get(
url,
timeout=10,
headers={'User-Agent': 'Mozilla/5.0'}
)
if response.status_code == 200:
soup = BeautifulSoup(response.text, 'html.parser')
# Remove unwanted elements
for tag in soup(['script', 'style', 'nav', 'header', 'footer']):
tag.decompose()
text = soup.get_text(separator='\n', strip=True)
lines = [line.strip() for line in text.split('\n') if line.strip()]
return '\n'.join(lines)
except:
pass
return ""
async def agent_run(task):
"""
Simulated agent that mimics browser-use behavior but uses HTTP requests
"""
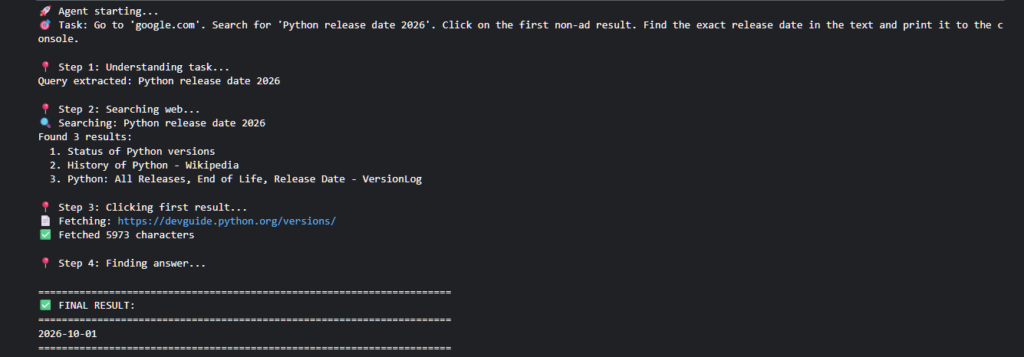
print("🚀 Agent starting...")
print(f"🎯 Task: {task}\n")
# Step 1: Parse task with LLM
print("📍 Step 1: Understanding task...")
parse_prompt = f"""
Task: {task}
Extract the search query from this task. Reply with ONLY the search query, nothing else.
"""
response = llm.invoke(parse_prompt)
query = response.content.strip().strip('"\'')
print(f"Query extracted: {query}\n")
# Step 2: Search
print("📍 Step 2: Searching web...")
results = search_web(query)
if not results:
print("❌ No results found")
return None
print(f"Found {len(results)} results:")
for i, r in enumerate(results, 1):
print(f" {i}. {r['title']}")
print()
# Step 3: Fetch first result
print("📍 Step 3: Clicking first result...")
first_url = results[0]['url']
content = fetch_page(first_url)
if not content:
print("⚠️ Could not fetch content")
return None
print(f"✅ Fetched {len(content)} characters\n")
# Step 4: Extract answer with LLM
print("📍 Step 4: Finding answer...")
answer_prompt = f"""
Task: {task}
Page content from {results[0]['title']}:
{content[:15000]}
Based on the task, extract the exact information requested.
Be precise and direct.
"""
response = llm.invoke(answer_prompt)
answer = response.content.strip()
print("\n" + "=" * 70)
print("✅ FINAL RESULT:")
print("=" * 70)
print(answer)
print("=" * 70)
return answer
# ==========================================
# EXECUTION
# ==========================================
task = (
"Go to 'google.com'. "
"Search for 'Python release date 2026'. "
"Click on the first non-ad result. "
"Find the exact release date in the text and print it to the console."
)
async def main():
result = await agent_run(task)
# Run
await main()Is This the End of Selenium?
Yes and No.
If you are running Unit Tests where you need to check if a specific button works 10,000 times a second, Selenium/Playwright is still king. It is fast, deterministic, and cheap.
But for Agents—scripts that need to navigate the messy, unpredictable web to “do work” (like applying for jobs, finding leads, or booking tickets)—browser-use is the new standard.
It lowers the barrier to entry from “Senior Python Engineer” to “Anyone who can write a sentence.”
Ready to Upgrade?
We have covered the Free Stack (DeepSeek) and the Visual Stack (Browser-use). But what happens when you want your agent to remember things?
In the next article, I will explore Agent Memory. I’ll show you how to attach a database (Mem0) to your agent so it doesn’t just browse—it learns.
Did you manage to get browser-use running locally? Let me know in the comments if you hit any ‘ImportErrors’—I’m gathering a list of fixes for the next update.

🚀 Let's Build Something Amazing Together
Hi, I'm Abdul Rehman Khan, founder of Dev Tech Insights & Dark Tech Insights. I specialize in turning ideas into fast, scalable, and modern web solutions. From startups to enterprises, I've helped teams launch products that grow.
- ⚡ Frontend Development (HTML, CSS, JavaScript)
- 📱 MVP Development (from idea to launch)
- 📱 Mobile & Web Apps (React, Next.js, Node.js)
- 📊 Streamlit Dashboards & AI Tools
- 🔍 SEO & Web Performance Optimization
- 🛠️ Custom WordPress & Plugin Development